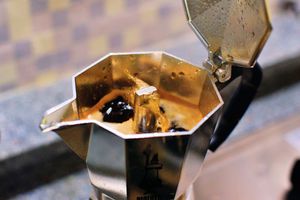

A moka pot, also known as a stovetop coffee maker, is one of the simplest ways to make strong, full-bodied coffee at home without an electric coffee machine.
The principle is simple: water in the lower chamber heats up, steam creates pressure, and hot water moves upward through a layer of ground coffee. The brewed coffee collects in the upper chamber.
Because of pressure, high temperature, and a metal filter, moka pot coffee is fuller-bodied than coffee brewed with V60, Kalita, drip coffee bags, or a drip coffee maker. But it is not true espresso. The pressure in a moka pot is lower than in an espresso machine, so the drink is closer to strong concentrated coffee than to classic café espresso.
The strength of the moka pot is intensity, simplicity, and consistency. Its weak point is the high risk of bitterness if you overheat the coffee, use a grind that is too fine, or wait until all the pale watery liquid has passed through the coffee.
What You Need
For a basic brew, you will need:
- whole bean coffee or ground coffee;
- a moka pot;
- water;
- a stove or gas burner.
It is useful to have:
- a coffee grinder;
- a kitchen scale;
- a kettle;
- a towel or oven mitt.
A scale is not required because the moka pot’s design already sets a rough ratio between the lower water chamber and the coffee basket. But a scale helps you repeat the result more accurately, especially if you are adjusting the grind or trying to make a more concentrated drink.
How a Moka Pot Works
A moka pot has three main parts:
- the lower water chamber;
- the filter basket for ground coffee;
- the upper chamber where the brewed coffee collects.
The lower chamber has a safety valve. It releases excess pressure if water cannot pass through the coffee properly. This can happen if the grind is too fine, the coffee is tamped, or the basket is clogged.
That is why, with a moka pot, it is important not to tamp the coffee, not to overfill the basket, and not to cover the valve with water.
What Grind Size to Use
For a moka pot, you need a medium or medium-fine grind.
Use this guide:
- finer than V60 or Kalita;
- coarser than espresso;
- roughly like fine sea salt.
If the grind is too coarse, water will pass through too quickly, and the coffee will taste thin, slightly sour, and watery.
If the grind is too fine, the water will struggle to pass through. The coffee may become bitter, dry, and harsh. In the worst case, pressure in the lower chamber can rise too high and trigger the safety valve.
For a starting point, use a grind slightly coarser than espresso, then adjust by taste.
How Much Coffee to Use
The simplest moka pot rule is:
fill the basket level with coffee, without heaping and without tamping
The amount of coffee depends on the size of the moka pot.
| Moka pot size | Approximate coffee amount |
|---|---|
| 2 cups | 12–14 g |
| 3 cups | 15–18 g |
| 6 cups | 25–30 g |
These numbers can vary depending on the model, basket shape, and grind size. So the main guide is not only grams, but also the level of coffee in the basket.
Distribute the coffee evenly. You can gently tap the basket on the counter so the coffee settles more evenly. But do not tamp it.
Pressure in a moka pot is not created the same way as in an espresso machine. If you tamp the coffee, water may pass through unevenly or may not pass through properly at all.
How Much Water to Add
Add water to the lower chamber up to a level below the safety valve.
The valve must not be covered with water.
If you add too much water, the brewer will not work correctly. If you add too little, you will get less coffee and the heat may be less stable.
water — below the valve, coffee — level with the basket
Cold or Hot Water
There are two approaches.
The first is to use cold or room-temperature water. This works, but the process takes longer, the moka pot heats more slowly, and the coffee spends more time exposed to high temperature.
The second is to use hot water. This shortens the time the coffee spends on the stove and often gives a cleaner taste with less bitterness.
In most cases, it is better to start with hot water:
90–95°C
If you do not have a thermometer, bring the water to a boil, wait about a minute, and pour it into the lower chamber.
Important: the lower part of the moka pot will become hot. Use a towel or oven mitt when screwing the moka pot together.
What Heat Level to Use
A moka pot works best on low or medium-low heat.
High heat is a common reason for bitter and harsh coffee. Water passes through the coffee too aggressively, the upper chamber overheats quickly, and the drink loses clarity.
Correct moka pot behavior: coffee rises into the upper chamber in a calm, steady stream.
If the coffee splashes, hisses too early, or shoots upward aggressively, the heat is too high.
Basic Moka Pot Coffee Recipe
This recipe is for a full moka pot cup.
Coffee: level with the basket
Water: below the valve
Grind size: medium or medium-fine
Water temperature: 90–95°C
Heat: low or medium-low
Brewing time: about 3–6 minutes with hot water
Step-by-Step Brewing
- Heat the water to 90–95°C.
- Pour water into the lower chamber up to below the valve.
- Insert the filter basket.
- Add ground coffee level with the top of the basket.
- Level the coffee, but do not tamp.
- Check that no coffee grounds are left on the thread.
- Screw the upper part of the moka pot on firmly.
- Place the moka pot on low or medium-low heat.
- Leave the lid open if you want to monitor the process.
- Wait until coffee starts rising in a steady dark stream.
- When the stream starts to lighten and the first active sounds appear, remove the moka pot from the heat.
- Pour the coffee into a cup.
Do not wait until the moka pot keeps sputtering for a long time and pushes out pale liquid. Watery taste, bitterness, and dryness often appear at the end.
When to Remove the Moka Pot from Heat
This is the key moment in brewing.
There are two scenarios.
The first is a classic full moka pot cup. In this case, you wait until most of the water has moved into the upper chamber. But it is better to remove the moka pot not after long sputtering, but at the beginning of active hissing, when the stream is already getting lighter.
The second is a short concentrated drink. In this case, you do not wait for the full volume. You use only the dark, dense first part of the coffee and discard the pale watery part.
This option works especially well if you are making a base for milk drinks: cappuccino, latte, raf coffee, or coffee with cream.
For a full cup: remove it at the beginning of active hissing.
For a concentrated base: remove it earlier, once the dark, dense part has collected.
Concentrated Recipe for Milk Drinks
If you want to use the moka pot as a base for cappuccino or latte, you do not need to use the entire brewed volume.
For a 3-cup moka pot, you can use this setup:
Coffee: 15–18 g
Water: below the valve
Grind size: medium-fine
Water: room temperature or hot
Heat: minimum
What to use: only the dark concentrated part
With this approach, it is important not to wait until pale liquid starts actively coming into the upper chamber. The thicker dark part makes a better base for milk, while the final pale part often makes the taste rougher and more watery.
This method requires attention, but it better matches the task of making a base for a milk drink rather than simply getting a full cup of moka pot coffee.
Should You Stir the Coffee in the Upper Chamber?
If you are making a full moka pot cup, you can gently stir the finished coffee in the upper chamber before pouring. The first part of extraction is denser, and the last part is lighter, so stirring evens out the taste.
But if you are intentionally making a concentrated base and not using the final pale part, you do not need to mix it with the main drink.
Again, the key is to understand the goal: a full cup or a short base for milk.
How to Know What to Change
The coffee tastes bitter, harsh, or dry
Possible causes: grind too fine, heat too high, boiling for too long, or waiting until the end of active sputtering.
What to do: grind slightly coarser, reduce the heat, remove the moka pot earlier, use hot water to shorten stove time, and avoid using the final pale part if you are making a concentrated drink.
The coffee tastes sour or thin
Possible causes: grind too coarse, weak extraction, or water passing through too quickly.
What to do: grind slightly finer, check that the basket is filled level, use slightly slower heating, and let the coffee rise in a steady stream instead of removing it too early.
The coffee tastes watery
Possible causes: using the final pale part, grind too coarse, or not enough coffee in the basket.
What to do: fill the basket level with coffee, grind slightly finer, remove the moka pot earlier, and for milk drinks use only the dark concentrated part.
The coffee takes too long to rise
Possible causes: heat too low, moka pot assembled incorrectly, clogged filter, grind too fine, or coffee packed too densely.
What to do: check the assembly, make sure the valve is not covered with water, do not tamp the coffee, grind coarser next time, and check that the filter and gasket are clean.
How to Clean a Moka Pot
After brewing, let the moka pot cool slightly, take it apart, and rinse it with water.
Rinse these parts:
- the lower chamber;
- the coffee basket;
- the metal filter;
- the upper chamber;
- the gasket.
Do not leave used coffee grounds inside for a long time. They dry out, clog the filter, and make the next brews taste worse.
Avoid using aggressive cleaners on an aluminum moka pot. It is better to rinse it with water and dry it well. If you have a stainless steel model, care may be easier, but you still should not leave coffee inside.
How to Brew WEnergy coffee in a Moka Pot
WEnergy coffee can be brewed in a moka pot if you choose a grind suitable for this method.
Basic setup:
- coffee — level with the basket;
- water — below the valve;
- grind size — medium or medium-fine;
- water — 90–95°C;
- heat — low or medium-low;
- remove from heat — when the stream becomes lighter and active hissing begins.
If you use WEnergy coffee ground for a moka pot, you do not need to find the right grind size yourself. You only need to control the water, heat, and the moment when you remove the moka pot from the stove.
A moka pot is a good choice for people who want a fuller-bodied cup than classic filter coffee but do not use an electric espresso machine. It is a home method for making a rich drink in a small volume — on its own or as a base for coffee with milk.
The Main Point
A moka pot brews coffee using steam pressure: water from the lower chamber passes through ground coffee and rises into the upper chamber.
The basic setup is simple: water — below the valve. Coffee — level with the basket, without tamping. Grind size — medium or medium-fine. Heat — low or medium-low. Remove from heat — when the stream becomes lighter and active hissing begins.
If you want a full cup, use most of the drink, but do not overheat the moka pot. If you want a base for milk, use the dark concentrated part and do not mix it with the final pale liquid.
The strength of the moka pot is body and intensity. Its weak point is bitterness from overheating. So the key parameters are straightforward: the right grind, a level-filled basket, water below the valve, low heat, and removing it from the stove at the right moment.